
I will always remember Boxing Day 2015. Today was the day I was going to attempt to start the engine. I will be honest and say that I was pretty confident.
Oil Prime
First task was to prime the oil system. This was pretty easy as I had already done it once. Not sure what happened to the sound half way through….what I say is after priming you can see the oil coming out of the top of the pushrods (this is a good thing!)
Distributor
Distributor installation was next. I had already connected the cap to the plugs in the correct firing order, so the most important part was lining up the distributor with number one plug. I then temporarily connected the coil to the distributor and also connected the earth for the distributor. Once everything is working OK I will cut the wires to the correct length.


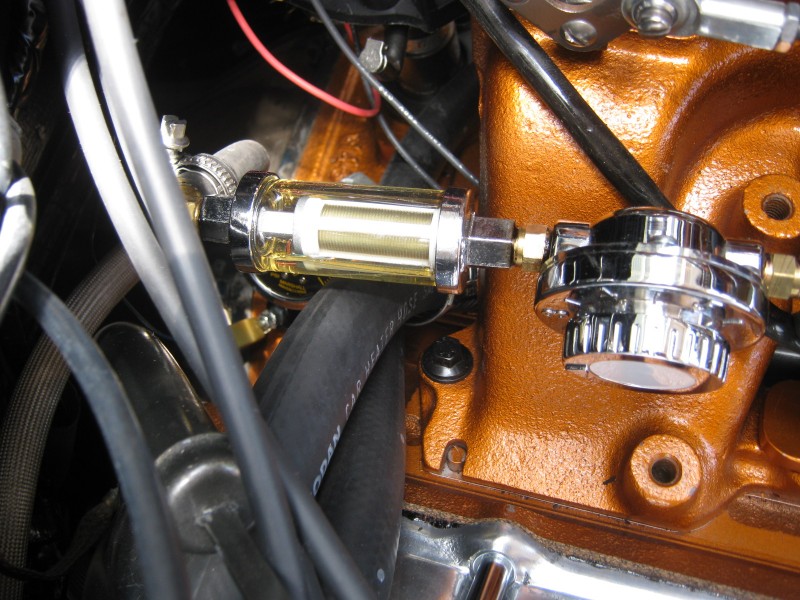
Fuel
Next I primed the fuel system. Based on the issues I had with leaks, I checked the whole system. Unfortunately I found a new leak from the fuel filter. The fuel filter was purchased as part of the carburettors and fuel rail. I hadn’t really taken any notice of the fuel filter as he had supplied it assembled. I went to tighten it up a little in case it had worked loose, and the thread snapped. I hadn’t expected this as it felt loose as soon as I went to move it. Closer inspection revealed that the seals had started to dissolve. Imagine what would have happened if I didn’t see this before starting the engine! Pretty disappointing.


Looking closer, I could see that it was based on a standard Chinese fuel filter, and the centre glass section has been replaced with a piece of turned aluminium. The reason I know this is I have a similar filter in the shed – mine looked to be a better design, so I thought I would use it instead.
I spent the next 30 minutes installing the filter (after removing the coil). The design was better as it had a central shaft which held everything together. Once it was together I noticed that one end did not sit square. The rubber seal seemed to take up the misalignment, but I was not prepared to take any chances with fuel delivery.

I removed it and installed a plastic universal Ryco filter I had. This is not ideal as it has a smaller inlet and outlet diameter, but it will do for now….and it won’t leak! It does look like crap though.
Final Checks
So now I had done everything I could think of in preparation. Fuel was OK. Oil system primed. Oil level OK. Cooling system OK. Automatic Transmission OK.
Combust or Bust.
The time had come. I enlisted the services of the family to turn the key and also take care of filming.
The engine turned over but had no intention of firing. I moved the distributor around a little with no real effect. It appeared to have no intention of firing up.
I then gave it another squirt of Engine Start to try and encourage some action. I got some action, but not what I wanted.
This ‘little puff’ however tell me that there was definitely an issue with the timing. I loosened the spark plugs as it was impossible to turn the engine with them all tight, and also removed the RH rocker cover. I turned the engine over by hand and quickly realized that I had the distributor positioned 180 degrees out. Looking back, this is the one thing I did not check as I was sure I had already set the crank with cylinder 1 at TDC (Top Dead Centre). The one thing I failed to check was the one thing I needed to check!
Once I put everything back together I called the family out for another attempt. This time the engine started. Unfortunately my daughter only got a short video, and missed the start up.
I now had to run the engine at around 2000rpm for 20 minutes to bed in the camshaft. I adjusted the timing so it ran OK. At about the 10 minutes mark I was checking everything and noticed that there was a small pool of liquid under the car. You know that hollow feeling you get when something like this happens…..well I got it.
I determined that it was engine oil. I checked the oil pressure gauge, and it was only running at 20 psi, however these engines do not have huge oil pressure. The rule of thumb for old V8’s seems to be 10psi per 1000rpm, so we are OK. I couldn’t check the oil pressure at idle as the engine needs to stay at 2000rpm to ensure the cam gets plenty of oil. The only option was to switch off the engine and have a closer look. I took a picture, but it is difficult to see the oil streak on the pan and the drip. It was leaking at a rate of a drip every 1 to 2 seconds.

A closer inspection didn’t reveal anything conclusive. The harmonic balancer was dry, and there was no oil being flicked around by the harmonic balancer. The oil looked to be leaking from the front of the engine, down along the oil pan surface until it found the lowest point and then dripped. I tightened the front of the oil pan and also the timing cover.
Based on the slow leak rate, I decided to finish the cam break in. I started the car again and within about 3 minutes the oil was dripping again. I have gone over this in my head what feels like 100 times, and I keep coming up with the oil pan gasket. I remember installing it and thinking that the joins were a perfect place for an oil leak. I also remember thinking that I should have used RTV silicone on the joins. If it was leaking from the joins, it would run down and not get to the harmonic balancer, so it makes sense.
In case you don’t know recall the area I am talking about, here are a couple of pics from the assembly. According to the Cadillac Workshop Manual, the oil pan gasket can be changed while the engine is in the vehicle. I guess this might have to be my next job….not looking forward to this task, but I don’t want to take the engine out again.


I had a couple of other issues along the way today….
- The alternator had a vibration, so I will need to make up another brace to support it.
- I couldn’t get the engine to idle consistently. Not sure if it is the outer carbs leaking or something else. This will take time to get sorted.
- The fuel pressure gauge stopped working….I am hoping a piece of crap has blocked the inlet
- I could not attached the brake booster vacuum hose to the back of the rear carb as the distributor cap is in the way – I need to find a 90 degree fitting for this.
- I can’t switch off the engine. When the key is turned off the engine keeps on running – I guess there must be a feedback somewhere which keeps the relay engaged.
- The mufflers now have holes in them. They looked old anyway, I guess they were older than I expected.
In summary, I anticipated today would be quite straight forward and take 2 or 3 hours, instead it took 6 hours, and the result was not as good as I had hoped.
Some days are diamonds…….some are not.

Hey , well done Tim. Glad you caught it on video!
Only a couple of minor teething issues, the oil leak is a bit of a bummer, hope it is something simple.
LikeLike
Hey Mick…..so do I
LikeLike
Well done, Tim. Your persistence is admirable. I remember your post on the multi-piece sump gasket….
‘Great milestone, even with the couple of additional jobs.
LikeLike
I have recovered now so I can keep on punching!
LikeLike
Hey Tim, great job on the old lady!
The oil pan can be removed without removing the engine, I just did it on my ’60 Caddy last week. You need to remove the steering bar (or whatever it’s called) and the starter motor.
The manual says you need to remove RH exhaust but I didn’t find it necessary. The 2 front nuts of the oil pan are a pain but I tackled them with a small ratchet and a long socket.
My pan had silicone gasket sealant on top of the old cork seals, it might do the job.
Best of luck to you from Finland.
LikeLike
Hey Riku,
Thanks for the tips. I am going to have a go at it next week.
I would love to see some pics of your Caddy.
LikeLike
Out of interest Riku, did you do it on jack stands or do you have a hoist?
LikeLike
Actually, I have an old school impractical oil pit, so the car is on all four wheels at the moment.
LikeLike
Sounds good. I don’t even have a pit so I am going to have to do it on my back 😦
LikeLike